A TECHNIQUE DRIVEN Blog dedicated to mastery of surface design techniques. First we dye, overdye, paint, stitch, resist, tie, fold, silk screen, stamp, thermofax, batik, bejewel, stretch, shrink, sprinkle, Smooch, fuse, slice, dice, AND then we set it on fire using a variety of heat tools.

Tuesday, March 26, 2013

Karen Weighs In

I have been very quiet this month, I know.  I have been reading the other posts and nodding to myself, yes, yes, I use that.  And yes, those are some of my favorite tools.  But I didn't want to just rehash the other posts.  My favorite thing is putting color on fabric --  I use paints, dyes, inks, and thread.  So I decided that my favorite tool is my stash -- not just the fabric, but all the stuff I use to make it colorful.  I am not particularly keen on sharing my personal space with the cyber-world; however, I am going to show a tiny bit of my solutions for storage of said stash.

I keep most of my fabrics on racks of wire shelves that I purchased at Costco and assembled myself.  I didn't put the wheels on them, but I saved them so if I move someplace where there isn't carpet on the basement floor I can attach them and roll them around -- wouldn't that be fun?!

I like plastic boxes for separating paints, dyes, inks, and all the other apparatus that I use to put color on fabric.  I store the boxes on the same kind of racks as my fabric.  I know this looks like a mess in the photo -- it's not.  Every box is labeled and while the arrangement isn't optimal because of space shortages, I know where everything is and it's all easily accessible.


 I'm not crazy about my thread storage.  I have these boxes that hold large spools neatly along side of smaller ones and they're all arranged by color.  But I keep running out of space and having to purchase more boxes.  And then (soon) I'm going to run out of space for the boxes.  I like these because they keep the dust off and they're clear, so I can see what's in them.  So they're fine for now.  But if anyone has a better solution -- I'd love to hear it.

Thursday, March 21, 2013

MY Favorite Tools/Aids

I thought I'd take this opportunity to weigh in on the favorite tools discussion. I have a few tools (besides those already mentioned) I use all the time. I'm not sure I really consider all of these to be tools; some I would consider to be aids.

As I've gotten older, I have more problems with my eyesight. I find that the light I have available is never enough. I really depend on the extra light provided by my “Bendable Bright Light” I have attached to my sewing machine.

The “Bendable Bright Light” is a small LED light that attaches to the side of my sewing machine with double-sided 3M adhesive. It puts out a bright light that can be directed exactly where it is needed. It eliminates the need to bring an additional lighting source when I go to a retreat or workshop. It is advertised that the product will last for 100,000 hours. No batteries are involved; you plug it in. When I first saw the “Bright Light” advertised, I thought it was too pricey. (You will pay anywhere from $30-$50 for this product.) I haven’t regretted the purchase a minute, though; I have trouble sewing without one now. An additional mounting kit that enables the “Bendable Bright Light” to be moved from machine to machine (if you use more than one) is available for purchase. The kit will cost somewhere between $8-$10.

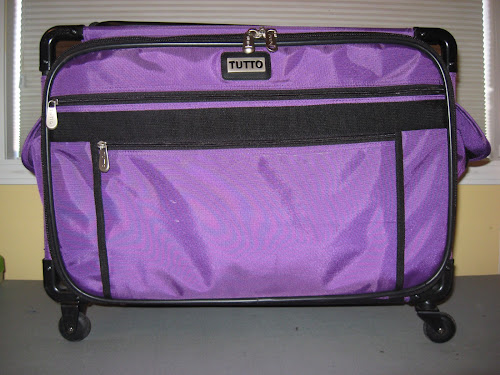
I also would have a hard time doing without my Tutto luggage. I own the large-sized Tutto for use with my Janome 6500. (My Bernina 1260 will fit in it too.) I LOVE this bag. I had previously purchased a bag to transport my machine, but I wasn’t very happy with it. It was hard to pull and hard to maneuver through doors and around objects. The Tutto is a different story. It is very easy to pull (even when loaded down with a heavy machine).


For transporting a sewing machine, I like the Tutto for the following reasons:
1. four wheels make the bag easier to maneuver and cause less stress on my back and arms

2. the padded U-shaped pull bar (which is attached to both sides of the luggage’s metal frame) and the location of the wheels make the bag more stable when moving it

3. it is light weight

4. there is ample storage space for the machine’s knee lift, foot pedal, power cords, extension cords, and a book or two

5. it folds to about 3” in width for easy storage when not in use

6. there are extra pockets on every side of the bag for carrying miscellaneous items

7. there is an “accessory” bag (I think they may call it a serger bag.) available that can be strapped to this bag providing all the space needed for the “stuff” necessary for a weekend retreat

The “accessory” bag can be attached to the Tutto luggage. This bag can hold a tremendous amount of quilting-related “stuff.” Before I had my Tutto, I had boxes and bags of retreat supplies; it took many trips to unload my car. With the Tutto and the accessory bag, I make one trip. Everything I need will fit into these two pieces of luggage.

When I want to mark quilting designs (or any other temporary mark) on my fabric, I absolutely LOVE the Bohin mechanical marking pencil.

The “lead” available for the pencil is made of a waxy chalk. It adheres to the fabric long enough to quilt the design, but it is easy to remove when I am finished quilting. The mechanical pencil includes an eraser which actually works to remove the chalk if you make a mistake or change your mind. The chalk refills come in several colors; I know these colors are available—white, gray, green, and yellow (there may be more). This pencil is very easy to mark with making a nice thin (0.9 mm), smooth line on the fabric. The Bohin mechanical pencil costs around $12 with refills costing around $6. The only con I have found is that when the lead gets to be about 1/2 inch long, the pencil won't mark. You can't keep the lead from pushing back up into the barrel when you try to make a mark. I think this is a big waste of lead, and it is very annoying. I'm hoping new models will correct this problem.


Last, but not least, is a porcupine quill. I use the quill to hold my fabrics in place when I am piecing. I don't do a lot of pinning because I find that the quill does a fabulous job of holding the pieces together.

As you can see, there is a VERY sharp end. That is the end I use to "pin" my fabrics together as they go under the presser foot of my machine. These quills are not real easy to find, so I buy one or two whenever I see them.

Tuesday, March 19, 2013

BSR ( Bernina Stich Regulator)

The tools I used the most during the creating process, computer and camera, have been discussed already.There is however one item that also gives me a lot of pleasure: the BSR on the Bernina 410 quilter edition.


Of course, real quilters prefer the use of the darning foot, I am aware of that, because the BSR tends to skip stitches from time to time. But to me , he gives me a kind of freedom.
I only use quilting when it is really necessary. This work ( 2008) is quilted a bit to much for me.
Most of the time, the fabric is too beautiful to add anything else. Putting on some accents is usually more than enough.( to give dept etc.)


Other works consists of quilting on " vanishing fleece". With this procedure I really can let go in drawing with the machine.
This are " window quilten"                    House in oure street.


                                                   Vieuw of my room in Marrakesh


Sunday, March 17, 2013

Thumbs up tools

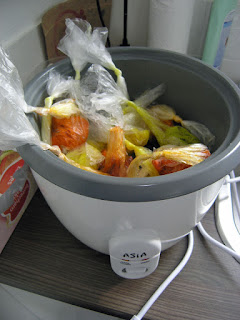
My turn for 'thumbs up' tools. As we are in cold lowland, most of the time we need some warmth to get those brilliant reactive dye colours. I use a cheap rice warmer for this purpose:


And I love regular sandwich bags to batch my dyed fabrics:


Recently, Drimarene-K, a fiber-reactive dye (as Procion-MX) reached the Netherlands as well, in a granulated form, so much less powder to fly around:


Love the deepness of the colours as well!


Also, a +1 to these dye tools, one can be used with those fragile stencils, the other two are  made of nylon synthetic fibre, so the dye-solution does not stick to the brush:

 
Finally, and this will definetely confirm the assumption that dutch people are tidy, it's my brandnew hand vacuum cleaner, to keep my workplace clean.


I love the ease and light weight of this brilliant, cordless, cleaner. So, enough 'likes' generated. What are your favourite tools?

Friday, March 15, 2013

Pencils, Papers, Prints and Pictures to See


I wouldn’t like to appear as a parrot, but pencil and computer happen to be my favourite tools as well. So I just thought to pick up a few aspects and tell, how I use them – apart the obvious.
 Never has any idea come to me just like that, ready-made. It takes time and consideration until the „first flash“ becomes visually ripe. My numerous sketchbooks are the witnesses of it. So pencils, especially soft pencils are my absolute favourite tools. Always I have a few with me, ready to use. One exercise I like to do, when the idea is still very new, just like a tiny flash on my mind: I take a piece of paper, big enough, and several pencils, mostly soft ones, and a charcoal as well, close my eyes and try to see inside, where the new idea is still hidden away, and draw … I change my pencils, draw as I feel like and take my time before opening my eyes again, because I would like to let some hidden ideas come to the surface, if possible. Surely I don’t expect to see any artwork before me afterwards, but I examine the quality of my lines, my marks because they might give me an new clue, where I’m heading. Half of the time I might discard the whole paper and repeat it another time again. But I have realized, even without producing anything “useful”, this kind of exercise just calms me down and helps me focus on my goal.
Now I have to admit, that I spend more time at my computer than I do at my sewing machine or at my drawing table...
Is it a bad thing? Not really, because computer has so many advantages, none of us would like to be without. I don’t want to list them, because so many of them are too obvious. But I would like to point out two things I use the computer for.

Have you ever wanted to visit the Louvre in Paris, the Tate Modern in London, the MoMA in New York, or whichever great museum comes to your mind? Even if you have visited them, haven’t you wanted to go again, just to check out something on whim? Most museums have their collections accessible on the web, often with additional information about the painting and the painter. So why not use them? Why not spend some time browsing through these great collections? I used to collect pictures of inspirations in my notebooks. Now I just collect URLs of the pictures I like. It’s easy, it’s free and it is fun.

The second is a simple way to convert your photos into screen patterns for a thermofax machine without using Photoshop. Even though I have Photoshop, I still use this method, because it is much faster and easier to work with. For a thermofax screen you need to have a black and white print, without any grey hues, because you never know if the greys will be burned out or not.
If you have a photo with strong contrasts in it, than that is already enough.
Like this one of a tree trunk. 
I Insert Picture into a word document, right click on the photo to get short menu and select Format Picture; here select Picture tab; under Image Control change Colour from Automatic to Black and White, print it on a laser printer and it is ready to use with the Thermofax.
Another example, a timber floor board.
And converted into black and white.

Time to time I would like to use a photo without strong contrasts. I use the same steps as last time but at Image Control I can also increase the contrast of the photo - this time I used 70 %. Usually 60-70 % works well but experiment with it.

Sometimes I have a photo which - turned into black and white - gives me the impression of a negative picture. This happens for example, because of the light is on the leaves and the background is dark, like on these bamboo leaves.

The black and white screen pattern gives the impression of being a negative. So I put the image in whatever picture editor program I have, turn it into a negative and this negative is the one I copy into the word document and proceed with it as written above.

Often I even use both the positive and the negative image for printing.

Tuesday, March 12, 2013

My #1 favorite tool

My computer. My life would be devastatingly diminished without my computer and my internet connection. I have always been a curious person and the computer has the answer to almost all of the things I want to know. I can learn from a multitude on Youtube or spend some time on DMTV with the Kemshalls or visit any artist and click on images of their work. On my browser (address bar) I can type in a question and Time/Warner will electronically whisk me to the answer. In fact I can make art with a stick in sand but answers, oh my, are all it for me.

I love color and I use dye and wax to to create colors and images on fiber along with  my 4' X 8" printing table and silk screens. I also love the Dollar Tree and can find all the cheap tools I want there.


This will sound like heresy on this blog but I could live the rest of my life quite happily with my watercolors, pens , pencils and sketchbook.

Sunday, March 10, 2013

Surgical Tweezers

I haven't decided my favorite tools but while I was blog hopping I found this post by Denise Russell at Pieced Brain.  It made me think of Kathy Loomis's comment about her tweezers!

Tools of the trade


After reading Jane’s post on her favorite tools, I began a mental inventory of what I rely on most in my fiber arts projects.  Being primarily a dyer, of course I have  tools to measure, mix  and store my dyes.  But I also do batik, as well as other surface design techniques, and I use my fabrics in art quilts and other fiber arts projects.  So I started to gather the tools I use the most.  Here are some of them:

Starting from the top and going clockwise:  My wax pot, which is a thermostatically controlled deep fryer; my can of dust remover, which I use frequently to remove lint from my bobbin case holder on my sewing machine; spring clamps, which are very helpful in anchoring fabric on a project board for dye painting, batik, stamping, etc.; a good pair of scissors dedicated solely to cutting fabrics; my “purple thang” which I had never heard of until I took a quilting class last year!  It is an immense help keeping fabric ends flat while I am stitching over them; my steel yardstick, which is wonderful for using with (next) my rotary cutter.
Here, I have my Pfaff sewing machine, along with my Sew Steady’ portable plexiglass table.  It fits around my machine neck, and has adjustable feet.  To the right you will see a spool holder… very handy for using cones of thread!

This isn’t a very exciting picture, but I couldn’t leave out my design wall.  I had never heard of such a thing until I took my first basic quilting class around 8 years ago, then saw several bloggers talk about theirs.  I attached a piece of felt to a 1” x 1” strip of wood which I screwed into the wall.  I use clothes pins and straight pins to attach whatever I’m working on, so I can stand back and get a better view.  It’s not very large, but it sure helps!

Shoe boxes and wire cubes help me to keep my stash in some semblance of order.  I have them sorted by colors so it’s easier for me to find what I’m looking for, and much easier to clean up once I’m done with a project!

Finally, my camera.  I bought my digital probably 7 or 8 years ago, and can’t imagine what I would do without it!  It helps me see what I’m working on, gives me a way to share my projects on my blog, and is extremely helpful to me when I am adding new items to my on-line shop.  One of my best investments!

Monday, March 4, 2013

Serendipity Scrunch

This "technique" I discovered quite by serendipity some time ago. But I so loved the outcome that sometimes I do it on purpose.

I take PFD and let it soak in soda ash until the liquid has all evaporated.  What's left is as hard as a rock.  The first time I thought I had ruined the fabric. But....since I didn't have anything to lose, I squirted dye onto it. And I loved the results!!

Here are two fat eighths after the SA has all evaporated.  You can't tell it is quite hard by the photo so you'll just have to take my word for it (ORRRRR experiment with it on your own!!)


I used dye I had mixed for another project, let it batch. Washed it out and ironed it and VOILA!!
Great FIRE colors don't you think?


Saturday, March 2, 2013

And Just What Are Jane Dunnewold's Favorite Tools

Yesterday, Jane Dunnewold shared an essay with us about choosing the right tools for the job at hand. Today, she tell us what some of her favorite tools are. Jane says...

The tools I couldn't live without? Or should I say - the tools that make my work better, cleaner, easier?

1. My Rowenta steam chamber iron. This was the best investment I made in 2011. The steam is always there, very powerful and makes fusing a snap. Having the iron separate from the steam chamber makes it lighter to use so I can iron a huge piece on the large cutting table by putting the iron on a rolling cart and moving it around the work table, without getting hand fatigue.

2. Misty Fuse. I never went to the original School of Fusing founded by Laura Wasilowski, but I am a convert now! Misty Fuse is the best product of its type on the market today. I use it to bond my backing fabrics to the art work, I use it to create wonderful gold leaf textures on my pieces, and I LOVE, LOVE the way the black Misty Fuse looks behind a sheer white fabric. It adds yet another layer of subtle texture. Add to this the fact that Iris Carp is one of the most responsive providers of product and service I have ever encountered and it's all a Win.

3. My 9" fabric squeegee made by Hunt Speedball. Learning to use the right squeegee jumped my work ahead leaps and bounds. This is NOT the red plastic one they make and it's NOT the graphic squeegee  either, so if you look for one make sure it is the "fabric" model. Good printing is all about the tool and the mastery of technique. With this squeegee I can print house paint on silk and barely feel it.

What are your favorite tools? What tool is it that makes YOUR work better? What tool makes it easier for you to do what you do? Check back this month to find out what our favorite tools are.

Friday, March 1, 2013

The Right Tool for the Job--Jane Dunnewold

This month, I feel honored to introduce an essay by Jane Dunnewold.
Jane Dunnewold is the author of Complex Cloth (1996) Improvisational Screen Printing (2003), and co-authored Finding Your Own Visual Language (2007). Interweave Press published Art Cloth: A Guide to Surface Design on Fabric in 2010. Dunnewold is the former chair of the Surface Design Studio at the Southwest School of Art. She teaches and lectures internationally, including recent tours to Australia, Italy and the United Kingdom. Dunnewold’s work was featured in the one-person exhibitions Sacred Planet (2009/2011) and Etudes: A Daily Practice (2011). She was awarded the Quilt Japan Prize in the 2002 Visions exhibition, and the Gold Prize, at the Taegue International Textile Exhibition. Currently the President of the international Surface Design Association, she maintains Art Cloth Studios, in San Antonio, Texas, USA. Additional information on commissions and exhibition experience can be found at complexcloth.com. Essays on the creative process and acts of making are offered regularly at existentialneighborhood.blogspot.com.

Choose the Right Tool for the Job
When Zenna was ten, her five year old half-sister Charlotte spent Saturdays with us. As the ex-wife, I was determined to befriend Charlotte’s mother because I knew what she was up against. And neither of us wanted the girls to miss out on the joys of sisterhood.

It was the spring of Zenna’s first softball team. Even at ten she hated not being in control of everything, and hated striking out even more; she needed to learn to be a team player. She got out of the car grudgingly; dreading the two hour practice. Charlotte blew kisses from the back seat. We were off to run errands while Zenna played ball.

Less than two miles from the playing field, on a wooded stretch of uphill road, the car ran out of gas. In those days I was distracted more often than not, and this wasn’t the first time I’d neglected to check the fuel gauge. One time we ran out of gas on forlorn Interstate 35 in the middle of Kansas, and Zenna’s father had to hitchhike seven miles to find a gas station, but that’s another story.

This time the car coasted to a stop. Cell phones had barely been invented, and were still the size of a shoebox, and I couldn’t afford one. So I unstrapped Charlotte’s seatbelt and we sat down on the curb while I figured out what to do.

Heavy into guilt and thinking, I didn’t notice Charlotte poking around in the bushes near the sidewalk until she exclaimed “Hey, look at this!” She lifted a moldy flour tortilla out of the bushes, and held it up for examination.

“Agghh!” Was I screeching? “Put that down! It’s dirty!” Charlotte dropped the tortilla like a hot potato. “It’s germy,” I said. “Don’t touch stuff like that!”

I watched as she opened the car door and retrieved her small backpack. With great deliberation she unzipped the zipper and reached inside. She pulled out a pair of green rubber gloves, proceeded to put them on, and then picked up the tortilla defiantly. I burst out laughing. “Why have you got those gloves?” I asked.

“Harriet the Spy has gloves.” Charlotte said matter of factly. “She is always prepared.” She tossed the tortilla back into the bushes.

Within minutes we were rescued by a nice man in a big truck. He called AAA from his cell phone and gas was on the way.

Zenna switched to basketball the following year, grew to be over six feet tall, and got good at it. I started remembering to keep an eye on the gas gauge.

This story sticks in my head because it so perfectly demonstrates the importance of having the right tool for the job. You can’t paint a house with a two inch brush - well, maybe you can, but it will become the job of a lifetime. A Wilton sprayer sure works faster. You need the right knife to cut stencils, the right flat brush to paint backgrounds on canvas, the right needle to stitch precise patterns on cloth.

So that’s the first thing to remember. Inventory your tools. Make sure you have what you need and aren’t settling - because settling won’t do your efforts justice. Honor your work enough to own exactly the right needle for special thread. Buy the perfect brush for painting spidery
India ink lines if you don't already have it.

The second thing to remember, which is a harder sell because many of us don’t want to work hard at making art, is that getting good at anything takes time and practice. We may just want it to happen, but that isn't usually how it goes. We call it playtime, but in a way, characterizing it as play time doesn't do our efforts justice.

There is most certainly an aspect of playing to making art. It’s a way to get started, and that can’t be underestimated. Fooling around in the studio whets your appetite for working, and encourages fresh ideas to bubble up. But it can go the other way, too. Frequently it works out better if the playing happens after the planning. If you don’t put any effort into planning tools or colors or composition, and you just expect it to work out, you’ll be rewarded some of the time, because the odds are good that at least part of the time you’ll luck out. But the odds of whether you’re satisfied with what you make increase - if you spend time preparing to work prior to actually working.

It’s one of the paradoxes. Pull together the tools you might need before you start printing. Think about the designs you want to make, the colors you plan to use, the scale of the piece you envision. If you’ve got all the individual parts ready to go, then the whole can happen without distraction. Need a tool? You’ve got it. No stopping to go find it or order it on-line. Need just that right red? Bingo. Plenty of paint and the knowledge to mix it.

Effort that sounded tedious transforms into playtime. Undistracted playtime. Just don’t forget your rubber gloves.

Thank you Jane! Tomorrow, Jane will tell us what some of her favorite tools are. Then, throughout the month, we (the resident artists) will tell you what OUR favorite tools are. Stay tuned!